There’s no denying that this is a plate full of colour; it’s also absolutely bursting with flavour. These Tandoori Chicken Flatbreads are a recipe of two halves: you can make it all at once, or alternatively, do as I did and batch cook the tandoori chicken and keep it in the freezer to make weeknight meals like this. The flatbreads are topped with a whole load of fresh salad, spiked yoghurt, mango chutney, the warm chicken and fresh chillies. They are really flexible too; you can add or leave out anything that you prefer.
Spring Vegetable Tray Bake
There’s a certain time of year where the contents of the veg box are suddenly more vibrant. There’s something red or orange which isn’t a carrot and something green which isn’t cabbage. Don’t get me wrong, I have nothing against a good brassica but when the first spring vegetables come through you know that it’s not long until the spring and summer veg are in full swing. To mark this occasion I made a spring vegetable tray bake; to celebrate all that is delicious at this time of year.
Salami and Mozzarella Open Ciabatta
Sometimes there’s nothing better than a sandwich. It could be a properly crusty, thickly sliced loaf filled with simple cheese and chutney, a bagel filled with pastrami, gherkins and mustard or some thin rye bread topped with smoked fish and herbs. I don’t think I could ever tire of something that you can just grab and eat with your hands. My salami and mozzarella open ciabatta is just the thing for a simple, no fuss, full of flavour dinner. Don’t tell anyone but I could have eaten all four pieces to myself.
ingredients
You will need (for two big sandwiches or four smaller ones):
- 1 ciabatta loaf
- Handful cherry tomatoes, halved
- 1-2 tbsp olive oil for cooking and extra virgin olive oil
- Balsamic vinegar
- Salt and pepper
- 1 garlic clove, peeled and sliced in half
- 1 ball mozzarella, torn into small pieces
- 8 slices salami
method
Start by baking the ciabatta according to packet instructions. Leave to cool before slicing in half lengthways and opening the ciabatta up, then slice it in half again so you end up with four equal sized pieces.
Turn the oven to 220C and put the tomatoes in a single layer in a baking dish. Drizzle over the olive oil and balsamic vinegar, add the vinegar to suit your taste, and then season.
Bake for 20 minutes or until the tomatoes are starting to brown at the edges.
Preheat a grill to medium.
Rub the garlic clove, cut side down, over each open face of the ciabatta. Drizzle some extra virgin olive oil over the ciabatta and then place under the grill for a few minutes until lightly toasted.
Remove the ciabatta and then load each slice up with the tomatoes, salami and mozzarella. Put back under the grill until the salami has crisped up a little but be careful not to let the ciabatta catch.
Unintentionally this reminded me of a pizza and actually, considering how easy it is to make I would definitely try it again instead of a pizza! I love this combination of flavours; sharp and sweet tomatoes, creamy mozzarella and punchy salami. There are so many variations of this that you could make. One I would really like to try would be some leftover griddled aubergine, goat’s cheese and pesto. Or maybe one with figs, blue cheese and honey. Or maybe…
Greek Chicken Tray Bake
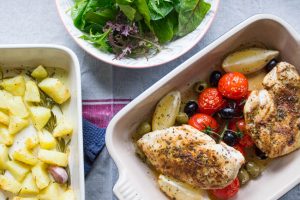
I love a straightforward dinner. However being straightforward doesn’t mean there’s any skimping on flavour. Grabbing a few ingredients out of the fridge and cupboards, chucking them in a roasting tray and miraculously taking the finished dish out of the oven at the end is the weeknight dream. My Greek chicken tray bake is a two tray affair (I know, slightly more involved than one tray) and really delivers on flavour. The flavours of Greece; oregano, tomatoes, olives make this a wonderful dish for this time of year.
Ingredients
You will need (for two):
- 350g potatoes, scrubbed and diced
- 3 large garlic cloves, crushed
- 2 sprigs fresh rosemary
- Olive oil
- Salt and pepper
For the chicken:
- 2 chicken breasts
- 2 tsp dried oregano
- 1-2 tsp sweet paprika
- 1 lemon, quartered
- Tomatoes, still on the vine if possible
- Handful stoned olives
- Olive oil
- Salt and pepper
Method
Start by adding the potatoes to a pan of cold, salted water. Bring the pan up to the boil and boil the potatoes for 5-10 minutes or until just softened when tested with a knife. Drain the potatoes and put to one side.
In a roasting dish add 2 tbsp olive oil, the garlic cloves and rosemary ad mix everything together to ensure the garlic and rosemary are well coated in oil. Tip the potatoes into this dish with some salt and pepper and give everything another good mix.
Bake the potatoes in a preheated oven at 180C for 30 minutes.
Once the potatoes are in the oven, start on the chicken.
Place each chicken breast between two sheets of cling film or baking paper and flatten slightly with a rolling pin, you want each one to be around 1cm thick.
Sprinkle the oregano and paprika over each piece of chicken with a little salt and pepper.
Put a large frying pan on a medium/high heat with a little olive oil. Fry the chicken until golden on both sides then turn off the heat and put to one side.
In another roasting tray put the lemon wedges, tomatoes and olives. Arrange the chicken on top of the tomatoes then add a little more salt and pepper and a drizzle of olive oil.
Add this to the oven with the potatoes for around 15 minutes, or until the chicken is cooked through.
Serve with salad if you like.
I think a small red onion, cut into wedges and nestled in amongst the potatoes would be a fantastic addition to this tray bake. It would also be worth adding a little sprinkle of feta over the chicken for a deliciously salty kick. When the chicken has finished baking, don’t discard all the tomato and lemon juices that have gathered in the roasting tray. They are absolutely delicious and need to be savoured and poured over the chicken. My Greek chicken tray bake even manages to make its own sauce; what more could you need?
Runner Bean and Tomato Stew
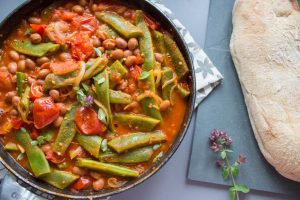
It’s bean season at the moment. There’s runner, French, broad and all manner of other beans popping up in the veg box, at the farmers’ markets and in friends’ gardens. I love a perfectly cooked and simply dressed bean salad; a little drizzle of oil, a squeeze of lemon and a little seasoning. However, from time to time it’s nice to do something different and this runner bean and tomato stew is a much slower way of cooking with green beans.
Ingredients
You will need (for four servings):
- 1 onion, sliced
- Olive oil for cooking
- 2 garlic cloves, crushed
- 1 tsp smoked paprika
- ½ tsp cumin
- ½ tsp dried chilli
- 8 large tomatoes, roughly chopped
- Large handful runner beans, sliced into finger sized pieces (you can use other beans here, French beans would just need halving)
- 2 tins borlotti beans, drained and rinsed
- 150ml vegetable stock
- Salt and pepper
- Few sprigs fresh marjoram or oregano
Method
Get a large frying pan onto a low/medium heat, add a little oil and the onions and fry gently for 15-20 minutes until well softened and just starting to turn golden.
Add the garlic and the spices and cook for a few more minutes.
Tip the tomatoes into the pan, turn the heat up to medium and leave the tomatoes to break down and soften for around 15 minutes.
Add the runner beans and vegetable stock to the pan and continue simmering for another 10 minutes.
Stir the borlotti beans into the pan and cook for a further 10 minutes.
Check the seasoning and add salt and pepper as needed. Pick the leaves from the oregano and stir these through just before serving.
Serve alongside some crusty bread.
The lightly spiced tomato sauce works so well with the softened runner beans and hearty Borlotti beans. Using fresh oregano makes such a difference to this dish as you get such a wonderful punchy flavour. I ate most of this with a spoon and then tore off hunks of bread to mop up all the spiced juices from the bottom of the bowl. A fantastic stew, perfect for this time of year; a dish full of summer flavours.
Simple BBQ Sides
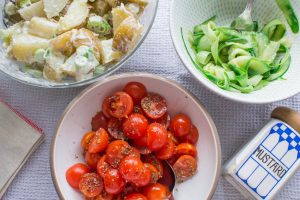
We bought our first ever BBQ this year. Not knowing how much it might get used we went for a basic entry level one which has been great, and it’s getting used at least once a week at the moment. When the BBQ is on I like to be outside, nice cold drink in hand, to watch everything cooking. That’s why these simple BBQ sides are my go to recipes whenever we’re cooking al fresco. I can make them quickly in the kitchen so they are ready to go once the hot food is ready.
Mustard Pickled Cucumber
You will need (for two as a side):
- 1 small or half a large cucumber
- 1 tbsp white wine vinegar
- 1 tbsp sugar
- Pinch salt
- 1 generous tbsp Dijon mustard
- 2-3 tbsp extra virgin olive oil
- Black pepper
Peel the cucumber into strips using a vegetable peeler and put to one side. You could salt the cucumber if you wanted to, I have tried salting it and leaving it to drain then squeezing the water out but I don’t think it really makes much difference for this.
Put the vinegar, salt and sugar into a small bowl and whisk together. Add the mustard and give it another quick mix.
Pour in the oil and whisk until all the ingredients are combined; a big whisk and a small bowl are helpful for this.
Check the seasoning, add a little black pepper and then pour the dressing over the cucumber.
Variation
If you add a little dill to this mix with some very thinly sliced onion is makes a great Scandi inspired side.
Balsamic and Herb Tomatoes
You will need (for two as a side):
- Large handful really ripe cherry tomatoes
- Pinch salt
- 2 tbsp extra virgin olive oil
- 1 tbsp balsamic vinegar
- 1 tsp dried oregano
- Black pepper
Start by halving all the tomatoes and putting them into a bowl. Sprinkle over the salt, mix it all together well and then leave for 10-15 minutes.
Add all the other ingredients and mix together well.
The reason I add the salt first is because it takes a little of the excess water out of the tomatoes which is delicious for two reasons: firstly it helps intensify the tomato flavour and secondly, you’re left with the tomato juice, oil, herbs and vinegar at the bottom of the bowl which is just asking to be mopped up with some bread.
Variation
I love adding avocado, torn mozzarella and loads of fresh basil to this. It’s also great if you roast this mix in the oven for 20 minutes if you want something hot.
Classic Potato Salad
You will need (for two as a side):
Aubergine and Ricotta Gnocchi Bake
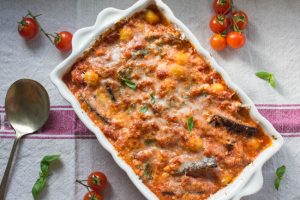
What’s that? More aubergines? Yes actually, and I make no apologies because this Aubergine and Ricotta Gnocchi Bake is so good that I think we can all forgive if I’ve been a little heavy on the aubergine recipes of late. The key to this dish comes down to two things. Firstly, the aubergine has to be fried beautifully to make sure it’s soft, silky and golden brown. Secondly, adding a handful of cherry tomatoes really transforms the tomato base as it adds a wonderful freshness and sweetness. This is such a delicious vegetarian dish and one that feels at home as much now, in the summer, as it would in the autumn.
Ingredients
You will need (for two):
- 2 medium aubergines, cut into length slices, then halved and chopped into finger sized pieces
- 1 small onion, finely chopped
- Olive oil for cooking
- 2 cloves garlic, crushed
- 1 tin chopped tomatoes
- Handful really ripe cherry tomatoes, halved
- 200g ricotta cheese
- Pinch sugar
- Few sprigs fresh basil and oregano, roughly chopped
- Salt and pepper
- Parmesan cheese
Method
Get a large frying pan on a medium heat and add a little oil, you need enough to just cover the bottom of the pan. Add the aubergine and fry until golden brown and soft. You may need to do this in batches depending on how much aubergine you have and how big your pan is. Once the aubergine is done place it on some kitchen paper to remove any excess oil.
Add a little more oil to the pan and add the onion. Fry for around 10 minutes before adding the garlic. Continue to fry for a few more minutes then tip in the chopped and cherry tomatoes.
Bring the tomato mixture to a simmer and continue to simmer until it’s reduced by around a third then add the sugar, salt and pepper, basil and oregano.
Bring a pan of salted water to the boil and cook the gnocchi according to pack instructions; but drain them around 30 seconds before the pack says to. The gnocchi will continue to cook in the oven.
Remove the tomato sauce from the heat and stir in the ricotta and aubergine.
Drain the gnocchi and add to the tomato and aubergine mix, stir everything together well and then put into an oven proof dish. Grate over a little Parmesan.
Bake in a preheated oven at 200C for around 20 minutes or until the top is golden and bubbling.
You could definitely try using any shape of pasta rather than gnocchi if you wanted to. I know you shouldn’t really cook with basil but I actually like the way the leaves wilt and give their subtle flavour over to the sauce once they are cooked. It’s great to dive into this dish and get a forkful of everything: sticky gnocchi, soft aubergine, creamy ricotta, a chunk of tomato, a bit of basil and a bit of punch from the Parmesan. I don’t think a few slices of fried courgette would go amiss either.
Roasted Aubergine and Tomato Pasta
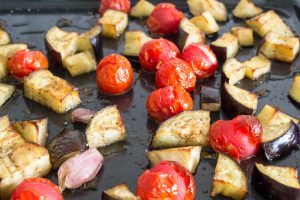
There have been several aubergine themed recipes on the meal plan and blog recently, I just can’t seem to eat enough of them! The combination of aubergine and tomatoes is a hard one to beat, it’s one of my absolute favourites. Even better when the veggies are roasted to intensify the flavour and served with cheese. My roasted aubergine and tomato pasta is the culmination of many attempts to get it just right. Dicing the aubergine up like this not only means a quicker cooking time but more aubergine surface area to soak up all that olive oil.
Ingredients
You will need (for two):
- 1 large aubergine, chopped into cubes around the same size as the cherry tomatoes
- 2 handfuls cherry tomatoes
- 3 tbsp olive oil
- Salt and pepper
- 3 garlic cloves, crushed but skins left on
- 150g pasta
- 125g mozzarella, torn or chopped into small cubes
- 3 sundried tomatoes, finely diced
- Few sprigs fresh basil, roughly torn
Method
Tip the diced aubergine, tomatoes and garlic onto a non-stick baking tray. Add a good glug of olive oil along with some salt and pepper and mix everything together with your hands so that everything is well coated in oil and seasoning.
Roast everything in an oven at 190C for 25-30 minutes or until the tomatoes are just starting to split and the aubergine is turning golden brown.
While the aubergine is roasting cook the pasta according to packet instructions.
Drain the pasta well and tip in the roasted veg (discarding the garlic) along with the sundried tomatoes, basil and mozzarella.
Dig in!
The hot pasta will start to melt the mozzarella which in turn will get all tangled with any caramelised bits of tomato or aubergine that you scraped off the tray. The silky aubergine, sweet tomato, creamy mozzarella, fresh basil and intense sundried tomato are such fantastic flavours together. I am yet to try batch cooking this and freezing it and I think without the cheese it would freeze quite well. You can serve it over pasta or use it as a bruschetta topping; I would be the last person to judge you if you just ate it on its own. Another version with ricotta will be experimented with soon too. Any excuse for more aubergines in my kitchen.
Pea, Bacon and Sundried Tomato Risotto
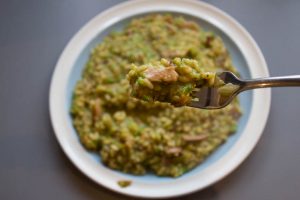
I love how a recipe evolves over time. Many risottos have been made in my kitchen over the years and I have to say a pea risotto has got to be one of my favourites. This recipe for pea, bacon and sundried tomato risotto is, in my opinion, the very best it can be. Other variations have included chorizo, fried speck, mint, goat’s cheese or spinach but this combination of ingredients gives such a variety and depth of flavour that is hard to beat.
ingredients
You will need (for two people):
- 1 small onion, finely diced (preferably not a red onion)
- 2 tbsp olive oil
- 1 small garlic clove, crushed
- 4 sundried tomatoes, finely chopped or sliced
- 175g risotto rice
- 500-600ml hot vegetable or chicken stock
- 1 mug full frozen peas
- Small knob of butter
- 4 rashers smoked bacon, chopped
- Salt and pepper
- 25g Parmesan cheese, grated
method
Start by adding the oil and onion to a saucepan and frying gently for at least 15 minutes until the onion is softened and not coloured. Add the garlic and sundried tomatoes and continue frying for a few more minutes.
Stir the rice into the onion mixture and cook for another minute or two before adding a little vegetable stock.
Add a little vegetable stock to the rice mixture at a time stirring well between each addition and ensuring the stock has been full absorbed before adding the next.
While the risotto is cooking you’ll need to get a small pan of water boiling for the peas and a frying pan heating up for the bacon.
Test the rice to see if it’s cooked and if so, remove the pan from the heat, pop the lid on and leave to one side for five minutes.
While the risotto is resting cook the peas in the boiling water and fry the bacon until crispy.
Blend the peas with a little butter to make a rough puree. If you’d rather add the peas whole that’s no problem, I just love the bright green colour blending them gives the risotto.
Stir the peas, bacon and Parmesan into the risotto, check the seasoning and add a little salt and pepper if it needs it.
At the heart of any good risotto is of course the perfectly cooked rice, cheese and onion combo. Adding the sundried tomatoes gives such a punchy, savoury flavour which coupled with the sweet peas and salty bacon is just the best. Slightly different to my normal weeknight recipes where I try to use as few pans as possible this recipe is definitely worth the extra washing up.
Carrot, Chickpea and Harissa Soup
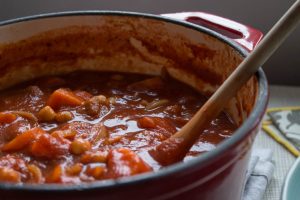
I meal plan. Only the dinners mind you. I’d like to think I was organised enough to plan fantastic breakfasts and fabulous lunches but I’d much rather have longer in bed each morning than fuss around with an avocado and quickly grab something easy for lunch in the week. However, there are consequences to this nonchalant attitude of mine. What if disaster strikes? What if, as I enjoy my chicken sandwich for lunch I realise that chicken is on the meal plan for that night? It doesn’t bear thinking about. So I don’t; I have a very simple way round this predicament instead. Make lunches vegan, and if not vegan, vegetarian. Hello Carrot, Chickpea and Harissa Soup.
Ingredients
You will need (for four big bowls):
- 2 onions, peeled and sliced
- 3 carrots, peeled and chopped into large chunks
- 2 tbsp harissa paste
- 1 tin chickpeas, drained and rinsed
- 250ml vegetable stock
- 8 apricots, roughly chopped
- 700ml tomato passata
- Oil for cooking
- Salt and pepper
Method
Add a little oil to a saucepan and add the onion and carrot. Fry, stirring from time to time for at least 10 minutes until the onions are soft and starting to brown at the edges.
Stir in all the remaining ingredients and bring everything to a boil. Reduce the heat and simmer for 15 minutes.
Divide the mixture into bowls and serve straight away, or divide into portions and freeze.
This recipe also makes a delicious cheat’s tagine if you continue cooking it slowly to thicken it. Simply serve it with some tabbouleh.
The sweetness from the carrots and apricots is delicious with the acidic tomatoes and spicy harissa. The chickpeas add a real substance to the soup and with all those different veggies in there it’s all goodness. I like to keep mine in portions in the freezer and take a pitta bread to work to have alongside.
I am getting involved with Centrepoint’s ‘The Big Broth’ with this soup. The Big Broth is Centrepoint’s latest fundraiser for homeless young people in the UK and they are asking people to submit their favourite soup recipe with the chance of having it produced by Yorkshire Provender. Then, each pot sold by Yorkshire Provender will mean 20p goes to Centrepoint. If you’d like to submit a soup recipe you can do so here.
- « Previous Page
- 1
- 2
- 3
- 4
- …
- 7
- Next Page »

