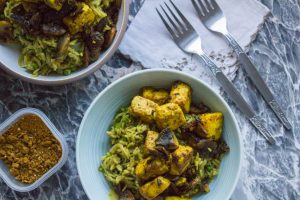
It is important to note that this recipe is not shy on calories. There’s cheese, double cream, lashings of olive oil, layers of pasta and plenty of veg. My green summer vegetable lasagne is quicker to make than a traditional lasagne (there’s no baking) and you can use the sauce with any pasta if you so choose. I like to think that all that green veg negates the calories and I happily ploughed through a whole plate of this. Bear in mind, I am very greedy and although the recipe below says it’s for two, it would definitely stretch to three or four!
Tandoori Chicken Flatbreads
There’s no denying that this is a plate full of colour; it’s also absolutely bursting with flavour. These Tandoori Chicken Flatbreads are a recipe of two halves: you can make it all at once, or alternatively, do as I did and batch cook the tandoori chicken and keep it in the freezer to make weeknight meals like this. The flatbreads are topped with a whole load of fresh salad, spiked yoghurt, mango chutney, the warm chicken and fresh chillies. They are really flexible too; you can add or leave out anything that you prefer.
Spring Vegetable Tray Bake
There’s a certain time of year where the contents of the veg box are suddenly more vibrant. There’s something red or orange which isn’t a carrot and something green which isn’t cabbage. Don’t get me wrong, I have nothing against a good brassica but when the first spring vegetables come through you know that it’s not long until the spring and summer veg are in full swing. To mark this occasion I made a spring vegetable tray bake; to celebrate all that is delicious at this time of year.
Vegetable Keema Rice with Crispy Paneer
At this time of year I get all the spices out of the cupboard and start to use those that I forgot about over the summer months. I found a tub of my homemade keema spice mix and although I know it’s delicious with lamb I wanted to try and make a veggie version. After trying out a few different vegetables and quantities I decided that I like this version of my vegetable keema rice the best. Not only is it easy and filling, it’s also got four different veg in and loads of texture from that crispy paneer.
ingredients
You will need (for two):
- Rapeseed oil for cooking
- 1 onion, sliced
- 2 garlic cloves, crushed
- 2 dsp keema spice mix
- 125g basmati rice
- 300ml water
- 2 nuggets frozen spinach (about the same as 4-6 tbsp blanched and chopped fresh spinach)
- 1/2 mug frozen peas
- Salt
For the crispy paneer:
- Rapeseed oil for cooking
- 1 heaped tsp turmeric
- 1 tsp cumin seeds
- Handful mushrooms, sliced
- 225g paneer cheese
- Salt
method
Heat a little oil in a lidded saucepan on a medium heat and add the onion. Fry for around 10 minutes or so until it’s starting to turn golden brown.
Add the garlic and the keema spices to the pan and cook for another minute or two.
Stir the rice into the pan so it gets all coated with the spices then pour in the water with a little salt. Pop a lid on the pan and leave for 12-15 minutes.
After this add the peas and spinach to the rice, stir the pan and then pop the lid back on and leave for another 8-10 minutes.
Test the rice to ensure it is cooked, all the water should have been absorbed by the rice, and add a little more salt if needed.
While the rice cooks you can get on with the crispy paneer. Start by heating a little oil in a non-stick frying pan on a medium/high heat. Add the turmeric and cumin and cook for a few minutes until smelling fragrant.
Tip the mushrooms and paneer into the spices and fry for 5-10 minutes, stirring regularly, until the mushrooms are soft and turning golden and the paneer is crispy on the edges. Add a little salt and check the seasoning.
Serve up the vegetable keema rice with the crispy paneer and mushrooms on top.
I really like the combination of veg in this meal. You’ve got sweetness from the onion and peas, a slight earthiness from the spinach and a rich mushroom flavour. By using a spice mix that you’ve already made (and which you can alter to suit your taste) means most of the hard work is already done and you can just sprinkle in those flavours! The crispy paneer is a fantastic way to add texture and it would be delicious to use some marinated paneer if you fancied.
Sticky Soy and Chilli Chicken Thighs
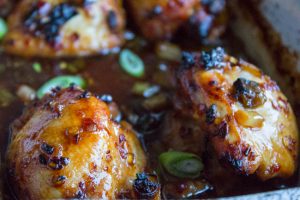
From time to time I get a recipe stuck in my head and I can think of nothing else until I make it. These sticky soy and chilli chicken thighs are exactly one of those recipes. There were several criteria that these thighs had to fulfil and anything short of my imagined flavour would not suffice. Most importantly they had to be sticky; properly glazed so that they left trails of marinade on the plate. Secondly, they had to have a salty soy base and a little chilli kick. The ginger, garlic, lime, onion and sesame were all added for depth of flavour. They were everything I wanted them to be.
ingredients
You will need (for two):
- 4 boneless, skinless chicken thighs
- 2 tbsp soy sauce (I used a low salt one)
- 1 tsp sesame oil
- Juice 1 lime
- 2 tbsp honey
- 2 garlic cloves, crushed
- 1 small piece ginger, around the size of a thumbnail, grated
- Pinch dried chillies
- 2-3 spring onions, sliced
method
Mix all the ingredients together except the chicken to make the marinade.
Put the chicken thighs into a roasting dish and pour over the marinade. Really mix the chicken and marinade together making sure you get some inside, over and under the thighs.
Put in the fridge to marinate for around an hour, longer if possible, but a shorter time wouldn’t be the end of the world.
Preheat an oven to 200C. Put the chicken into the oven with all the marinade and roast for 20 minutes. Remove from the oven, baste the chicken and return to the oven for another 20 minutes. Check the chicken is cooked through after 40 minutes total roasting time.
I served these sticky chicken thighs with a noodle salad full of fresh herbs.
Combining honey and soy together means you can’t go far wrong with a salty, sweet and sticky end result. The thing I love about roasting the chicken rather than frying it is that the chicken and marinade cook into each other and you’re left with a thick, unctuous sauce which is just asking to be spooned over the chicken. It would be delicious on the BBQ, you’d need to baste it often, and I think it would work really well with tofu too. This is my kind of comfort food. I can imagine a cold evening where I roast these, simply serve them with a bowl of white rice and let the leftover marinade mingle with the rice.
Greek Chicken Tray Bake
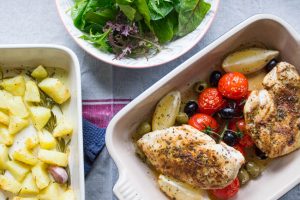
I love a straightforward dinner. However being straightforward doesn’t mean there’s any skimping on flavour. Grabbing a few ingredients out of the fridge and cupboards, chucking them in a roasting tray and miraculously taking the finished dish out of the oven at the end is the weeknight dream. My Greek chicken tray bake is a two tray affair (I know, slightly more involved than one tray) and really delivers on flavour. The flavours of Greece; oregano, tomatoes, olives make this a wonderful dish for this time of year.
Ingredients
You will need (for two):
- 350g potatoes, scrubbed and diced
- 3 large garlic cloves, crushed
- 2 sprigs fresh rosemary
- Olive oil
- Salt and pepper
For the chicken:
- 2 chicken breasts
- 2 tsp dried oregano
- 1-2 tsp sweet paprika
- 1 lemon, quartered
- Tomatoes, still on the vine if possible
- Handful stoned olives
- Olive oil
- Salt and pepper
Method
Start by adding the potatoes to a pan of cold, salted water. Bring the pan up to the boil and boil the potatoes for 5-10 minutes or until just softened when tested with a knife. Drain the potatoes and put to one side.
In a roasting dish add 2 tbsp olive oil, the garlic cloves and rosemary ad mix everything together to ensure the garlic and rosemary are well coated in oil. Tip the potatoes into this dish with some salt and pepper and give everything another good mix.
Bake the potatoes in a preheated oven at 180C for 30 minutes.
Once the potatoes are in the oven, start on the chicken.
Place each chicken breast between two sheets of cling film or baking paper and flatten slightly with a rolling pin, you want each one to be around 1cm thick.
Sprinkle the oregano and paprika over each piece of chicken with a little salt and pepper.
Put a large frying pan on a medium/high heat with a little olive oil. Fry the chicken until golden on both sides then turn off the heat and put to one side.
In another roasting tray put the lemon wedges, tomatoes and olives. Arrange the chicken on top of the tomatoes then add a little more salt and pepper and a drizzle of olive oil.
Add this to the oven with the potatoes for around 15 minutes, or until the chicken is cooked through.
Serve with salad if you like.
I think a small red onion, cut into wedges and nestled in amongst the potatoes would be a fantastic addition to this tray bake. It would also be worth adding a little sprinkle of feta over the chicken for a deliciously salty kick. When the chicken has finished baking, don’t discard all the tomato and lemon juices that have gathered in the roasting tray. They are absolutely delicious and need to be savoured and poured over the chicken. My Greek chicken tray bake even manages to make its own sauce; what more could you need?
Sausage, Broccoli and Spinach Pasta
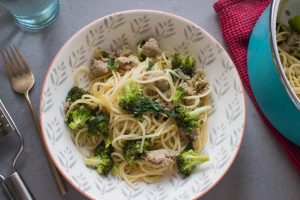
Using sausages when making a pasta sauce is a great way to add depth and flavour to the sauce and cut down on cooking time too. My most recent recipe creation came about because I had one too many broccoli heads in the fridge; so my sausage, broccoli and spinach pasta was born. I used some delicious Italian sausages for this which were flavoured with plenty of herbs and a little fennel. The spinach was added as an afterthought but actually I really liked the earthiness it brought to the dish.
Ingredients
You will need (for 6 portions, it freezes well):
- 1 onion, finely sliced
- 6 Italian sausages
- 2 cloves garlic, crushed
- Pinch dried chilli flakes
- 1 head broccoli, cut into small florets
- 150ml chicken or vegetable stock
- Handful fresh spinach, roughly chopped
- Salt and pepper
- Olive oil for cooking
Method
Start by adding a little oil to a large frying pan on a medium heat. Add the onion and fry for 10 minutes or so until softened.
Squeeze the sausage meat from the skins into the frying pan. Fry the sausage and onion together until the sausage is cooked through and starting to turn golden brown. Break the sausage meat down with a wooden spoon while it cooks.
Add the garlic and chilli to the pan and fry for another minute or two.
Tip in the broccoli and stir everything together well then add the stock and pop a lid on the pan.
Bring the pan to a boil then remove the lid and let it reduce to a thick sauce. Add the spinach for the last minute or so of cooking.
Cook the pasta according to pack instructions while you’re waiting for the pasta sauce.
Drain the pasta and season the pasta sauce then mix everything together and serve up.
I like how some of the broccoli breaks down and some stays in larger pieces and it gets really mixed through the sauce. The spinach ends up all silky and the chilli adds the tiniest bit of warmth to the sauce but it’s by no means spicy. Depending on which sausages you use the sauce will taste different so it’s a great excuse to play around with all sorts of flavours. If you mixed this with a little tomato or béchamel sauce I reckon it would make a spectacular pasta bake.
Carrot Falafel and Quick Pickled Onions
I’ve tried to make falafel a few times before without much success; it seems to fall apart when I cook it. Experimenting with this falafel recipe, a bit more of this and a bit less of that, means that I’ve now ended up with a pretty sturdy recipe. These carrot falafel are really easy to make; everything gets blended together, and I’ve served them with all my favourite sides. Quick pickled onions will be appearing on everything from now on!
Ingredients
You will need (for two):
- 1 tin chickpeas, drained and rinsed
- 100g carrots, grated
- 1 clove garlic, crushed
- 1/2 tsp ground cumin
- 1/2 tsp sweet paprika
- Zest 1 lemon
- 1/4 tsp chilli powder
- Salt and pepper
- 1 tbsp plain flour
- Sesame seeds
- Oil for frying
For the Pickled Onions
- 1 red onion, thinly sliced
- 1 tbsp sugar
- 1 tsp salt
- 100ml white wine or cider vinegar
Sides
Runner Bean and Tomato Stew
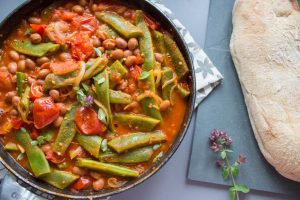
It’s bean season at the moment. There’s runner, French, broad and all manner of other beans popping up in the veg box, at the farmers’ markets and in friends’ gardens. I love a perfectly cooked and simply dressed bean salad; a little drizzle of oil, a squeeze of lemon and a little seasoning. However, from time to time it’s nice to do something different and this runner bean and tomato stew is a much slower way of cooking with green beans.
Ingredients
You will need (for four servings):
- 1 onion, sliced
- Olive oil for cooking
- 2 garlic cloves, crushed
- 1 tsp smoked paprika
- ½ tsp cumin
- ½ tsp dried chilli
- 8 large tomatoes, roughly chopped
- Large handful runner beans, sliced into finger sized pieces (you can use other beans here, French beans would just need halving)
- 2 tins borlotti beans, drained and rinsed
- 150ml vegetable stock
- Salt and pepper
- Few sprigs fresh marjoram or oregano
Method
Get a large frying pan onto a low/medium heat, add a little oil and the onions and fry gently for 15-20 minutes until well softened and just starting to turn golden.
Add the garlic and the spices and cook for a few more minutes.
Tip the tomatoes into the pan, turn the heat up to medium and leave the tomatoes to break down and soften for around 15 minutes.
Add the runner beans and vegetable stock to the pan and continue simmering for another 10 minutes.
Stir the borlotti beans into the pan and cook for a further 10 minutes.
Check the seasoning and add salt and pepper as needed. Pick the leaves from the oregano and stir these through just before serving.
Serve alongside some crusty bread.
The lightly spiced tomato sauce works so well with the softened runner beans and hearty Borlotti beans. Using fresh oregano makes such a difference to this dish as you get such a wonderful punchy flavour. I ate most of this with a spoon and then tore off hunks of bread to mop up all the spiced juices from the bottom of the bowl. A fantastic stew, perfect for this time of year; a dish full of summer flavours.
Aubergine and Ricotta Gnocchi Bake
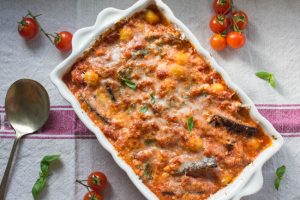
What’s that? More aubergines? Yes actually, and I make no apologies because this Aubergine and Ricotta Gnocchi Bake is so good that I think we can all forgive if I’ve been a little heavy on the aubergine recipes of late. The key to this dish comes down to two things. Firstly, the aubergine has to be fried beautifully to make sure it’s soft, silky and golden brown. Secondly, adding a handful of cherry tomatoes really transforms the tomato base as it adds a wonderful freshness and sweetness. This is such a delicious vegetarian dish and one that feels at home as much now, in the summer, as it would in the autumn.
Ingredients
You will need (for two):
- 2 medium aubergines, cut into length slices, then halved and chopped into finger sized pieces
- 1 small onion, finely chopped
- Olive oil for cooking
- 2 cloves garlic, crushed
- 1 tin chopped tomatoes
- Handful really ripe cherry tomatoes, halved
- 200g ricotta cheese
- Pinch sugar
- Few sprigs fresh basil and oregano, roughly chopped
- Salt and pepper
- Parmesan cheese
Method
Get a large frying pan on a medium heat and add a little oil, you need enough to just cover the bottom of the pan. Add the aubergine and fry until golden brown and soft. You may need to do this in batches depending on how much aubergine you have and how big your pan is. Once the aubergine is done place it on some kitchen paper to remove any excess oil.
Add a little more oil to the pan and add the onion. Fry for around 10 minutes before adding the garlic. Continue to fry for a few more minutes then tip in the chopped and cherry tomatoes.
Bring the tomato mixture to a simmer and continue to simmer until it’s reduced by around a third then add the sugar, salt and pepper, basil and oregano.
Bring a pan of salted water to the boil and cook the gnocchi according to pack instructions; but drain them around 30 seconds before the pack says to. The gnocchi will continue to cook in the oven.
Remove the tomato sauce from the heat and stir in the ricotta and aubergine.
Drain the gnocchi and add to the tomato and aubergine mix, stir everything together well and then put into an oven proof dish. Grate over a little Parmesan.
Bake in a preheated oven at 200C for around 20 minutes or until the top is golden and bubbling.
You could definitely try using any shape of pasta rather than gnocchi if you wanted to. I know you shouldn’t really cook with basil but I actually like the way the leaves wilt and give their subtle flavour over to the sauce once they are cooked. It’s great to dive into this dish and get a forkful of everything: sticky gnocchi, soft aubergine, creamy ricotta, a chunk of tomato, a bit of basil and a bit of punch from the Parmesan. I don’t think a few slices of fried courgette would go amiss either.
- « Previous Page
- 1
- 2
- 3
- 4
- …
- 9
- Next Page »
