• Facebook
  • Instagram
  • Pinterest
  • Twitter

All That I'm Eating

Recipe ideas for budget meals, everyday cooking and a little indulgence. Travel inspiration and restaurant reviews too.

  • Home
  • Recipes
  • Wild Food
  • Events & Reviews
  • Travel
  • About Me
  • Contact Me

Blackcurrant Frangipane Tart

September 10, 2020 By All That I'm Eating 31 Comments

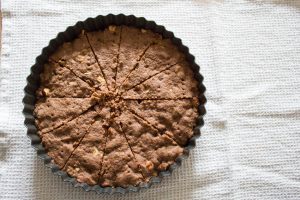
I can’t say no to blackcurrants; whatever they are in I will like it. They have such a distinctive flavour and when I found some at the market I had to set about making a blackcurrant frangipane tart. This tart is a marriage of two of my favourite things: blackcurrants and sweet almond frangipane.

The best thing about this tart comes from using raw blackcurrants. As they cook in the frangipane filling they burst and become sweet and sticky. The blackcurrants retain their sharp berry flavour but taint the tart with splashes of deep purple impromptu jam. With autumn just around the corner I can’t think of anything else I would rather spoon into my face. read more

Filed Under: Autumn, Baking, Berries, Blackcurrant, Butter, Dairy & Eggs, Eggs, Fruit, Nuts & Seeds, Pudding, Recipes By Month, Seasons, September, Tart Tagged With: Baking, Blackcurrant, pudding

Peach and Cherry Crumble

July 9, 2020 By All That I'm Eating 20 Comments

Whenever peaches are in season I always plan to cook something with them. More often than not though I just end up eating the peaches from the fruit bowl because they’re irresistible. Not this time! My peach and cherry crumble is so deliciously summery and the colour of the fruit once it’s baked is divine. I’m so glad some of the peaches survived to make this crumble.

The delicate white flesh of the peaches combines so well with the vibrant red of the cherries. As the fruit was really ripe I only added a small amount of honey as that’s all it needed. Don’t skimp on the lemon, it brings a much needed sharpness to the crumble. We enjoyed this as it is but it would be even better with a dribble of double cream. read more

Filed Under: Baking, Butter, Cherry, Crumble, Fruit, July, Peach, Pudding, Recipes By Month, Seasons, Summer Tagged With: cherries, crumble, pudding

Store Cupboard Shortbread

January 16, 2020 By All That I'm Eating 16 Comments

Shortbread in tin

I often find that I buy nuts or seeds to make something particular and I get left with a few grams of them here and there. That’s where my store cupboard shortbread comes in. This year I am attempting to use up ingredients in my cupboards and I thought I would start by using the last few dregs of cocoa powder and some leftover hazelnuts; I am so glad I did.

Ingredients

Makes 12 pieces of shortbread:

  • 175g plain flour
  • 1 tbsp cocoa powder
  • 50g caster sugar
  • 150g butter, softened
  • 50g chopped nuts, chocolate or seeds

Method

Grease a loose bottomed tart tin, mine was 20cm. Preheat an oven to 160C.

Add all of the ingredients to a bowl or food mixer and beat together until you get a ball of dough. read more

Filed Under: Baking, Biscuit, Butter, Chocolate, January, Nuts & Seeds, Recipes By Month, Seasons, Shortbread, Store Cupboard, Winter Tagged With: Baking, Biscuits, Chocolate

Banana Bread with Chocolate, Oats and Honey

October 24, 2018 By All That I'm Eating 10 Comments

banana bread with chocolate, oats and honey

You know those bananas that you keep avoiding in the fruit bowl? The ones which got a bit speckled a few days ago and now are fully fledged brown? Well, throw out your normal go-to recipe because my banana bread with chocolate, oats and honey is the way to go. Adding a few extra ingredients gives it a delicious flavour and texture and I have been very much enjoying having a slice for breakfast each morning. Any excuse to start the day with chocolate.

ingredients

You will need (for one banana bread loaf):

  • 125g butter
  • 3 medium overripe bananas
  • 2 eggs
  • 100g honey
  • 75g caster sugar
  • 250g plain flour
  • 2 tsp baking powder
  • 75g oats, plus a few extra
  • 100g dark chocolate, broken into small pieces

method

Grease and line a loaf tin and preheat the oven to 160C.

Melt the butter and honey together in a small saucepan and stir to ensure they are well combined.

Mash the bananas in a large bowl then pour in the butter and honey and crack in the eggs. Whisk everything together well.

Sift the flour, sugar and baking powder into the banana mix and fold everything in gently. Stir in the oats and most of the chocolate chunks.

Pour the mix into the prepared tin and then sprinkle the extra oats and leftover chocolate over the top.

Bake for an hour, then check on the loaf to see if a skewer comes out clean when inserted in the middle. If not, keep baking and checking it every 5-10 minutes until fully baked.

Leave the loaf to cool in the tin for a few minutes before removing and leaving to cool on a wire rack.

The oats on top of the banana bread have a lovely toasted flavour and the oats inside the bread swell up and have a deliciously chewy texture. Who can resist a slice of warm banana bread? It’s even harder to resist when you know it’s covered in and is full of melted chocolate. Dark chocolate is definitely the best choice for this as it works so well with the sweetness from the bananas, sugar and honey. The honey gives the cake a beautiful mellow flavour and slight sticky texture. If your banana bread lasts a few days and you want to freshen it up, try lightly grilling or microwaving it and serving with plain yoghurt. Honestly one of the best breakfasts imaginable.

Filed Under: Autumn, Baking, Banana, Breakfast, Butter, Cake, Chocolate, Dairy & Eggs, Eggs, Fruit, Honey, Oats, October, Recipes By Month, Seasons, Store Cupboard Tagged With: Baking, Chocolate, recipe

Strawberry and Peanut Tart

August 1, 2018 By All That I'm Eating 12 Comments

Strawberry and Peanut Tart

Minimum fuss and maximum results were the name of the game with my most recent dessert. Another hot day, the last thing I needed was to be baking pastry, so I didn’t, but made a tart nonetheless. My Strawberry and Peanut Tart makes use of a few sneaky kitchen shortcuts to make a delicious and impressive pudding. A chocolate and peanut base smothered with cream and stacked high with fresh fruit it almost seemed a shame to cut into it. But, you know, someone had to.

Ingredients

You will need (for 6-8 servings):

  • 180g dark chocolate digestives
  • 2 heaped tbsp peanut butter
  • 3 tbsp salted butter
  • 300ml double cream
  • 150ml low fat Greek yoghurt
  • Strawberries and cherries (or other berries)
  • 2 tbsp peanuts

Method

Start by heating the peanut butter and butter together in a small pan on a low heat. Stir from time to time until melted and mixed together.

Add the digestive biscuits to a bowl and then smash them up with the end of a rolling pin until you have a breadcrumb texture. Pour over the melted peanut butter and butter and mix together well.

Line a 20cm spring form cake tin then tip the biscuit mix into the tin, spread out over the base and flatten the top using the back of a spoon.

Refrigerate for an hour minimum, longer if you have it.

Prepare the fruit; chop the green bits off the strawberries, stone the cherries if you like, and put to one side.

Add the peanuts to a small, dry frying pan and heat on medium to toast the peanuts. Remove from the heat when lightly golden and smelling marvellous then crush in a pestle and mortar or in a bag with a rolling pin.

Whip the double cream until you have firm peaks. Gently fold the yoghurt through the cream.

Remove the base from the fridge and put onto a large plate. Pile the cream on top of the base and then top with the fruit. Sprinkle over the crushed peanuts.

This was one of those desserts that was so satisfying to cut through with a knife. Firstly you have to move it through the heavy fruit into the fluffy cream, then you meet a little resistance at the base with a very satisfying chink when knife meets plate. The dark chocolate in the digestives gives a hint of chocolate throughout the tart without being too overwhelming and the peanut taste in the base mirrored by the peanuts over the top brings a great taste and texture. Adding the yoghurt to the cream not only makes the cream go further without adding any extra fat but also gives a nice tang and freshness to the whole dessert. Juicy strawberries and cherries made a fantastic topping for this but any berries would work well too.

Filed Under: August, Baking, Cherry, Chocolate, Cream, Dairy & Eggs, Fruit, Pudding, Recipes By Month, Seasons, Strawberry, Summer, Tart, Yoghurt Tagged With: Chocolate, pudding, recipe, strawberry

Strawberry, Basil and Shortbread Mess

July 7, 2018 By All That I'm Eating 11 Comments

strawberry and basil mess

When there’s strawberries in the house that’s how I know it’s summer. I never eat them out of season; I feel like it’s worth the wait to abstain from eating strawberries for nine or ten months of the year and then gorge on them from late May until they disappear again. Mostly I just eat them as they are but sometimes I like to make something a little more interesting. This Strawberry, Basil and Shortbread Mess is exactly that. Something that doesn’t take long to make but turns a weekday evening into something a little more special. And it does look rather lovely if I do say so myself.

Ingredients

You will need (for two small puddings):

  • 1 shortbread wedge – see recipe below
  • Handful very ripe strawberries
  • 100ml double cream
  • Few sprigs fresh basil

For the shortbread:

  • 225g salted butter
  • 100g sugar
  • 275g plain flour
  • 1 tsp vanilla extract

Method

There are two ways of making this. The first, and the best in my opinion, is to make your own shortbread. The second is to use some shop bought shortbread or other biscuits.

To make the shortbread grease a 20cm tin with a little butter. I used a round one for this but I have used a square one for the same recipe, it just needs a slightly shorter cooking time.

Beat the butter until pale and creamy then add the sugar and vanilla and beat again until very pale, smooth and creamy.

Add the flour to the bowl and gently mix it in.

Tip the dough into the tin and then press it down with the back of a spoon. Prick the shortbread all over with a fork and mark into wedges.

Bake in a preheated oven at 160C for an hour or so or until the shortbread is golden brown.

Leave to cool and then re-mark the lines for the wedges before leaving to cool completely and then removing from the tin.

Marking and then re-marking the wedges will make it much easier to cut into pieces when you take it out of the tin.

Whip the cream until you have soft peaks. Finely chop three or four big strawberries and some of the basil leaves and then stir this through the whipped cream.

Divide the cream into two glasses or bowls then add some slices strawberries, crumbled shortbread and a little more basil.

Strawberry and basil is one of my favourite flavour combinations; I love the sweetness of the berries with the aromatic flavour of the soft basil. There’s just a small amount of cream in this, it would be a little heavy otherwise. The buttery, crumbly shortbread adds a fantastic texture to this little pudding and it would work really well with other summer fruits too. Trying different biscuits is certainly something I’ll be trying too! And if you’re after some more really easy strawberry recipes you can find some here!

Filed Under: Baking, Basil, Butter, Cream, Fruit, Herbs, July, Pudding, Quick Recipes, Recipes By Month, Seasons, Shortbread, Strawberry, Summer Tagged With: Baking, Biscuits, pudding, recipe

Chocolate, Thyme and Lemon Shortbread

April 2, 2018 By All That I'm Eating 10 Comments

chocolate shortbread after the baking

Adding herbs to bakes and drinks is something I really like to do. I like the botanical flavour that herbs can bring to various dishes and I think woody herbs really suit being paired with chocolate. These chocolate, thyme and lemon shortbread biscuits are a delicious combination of flavours if I do say so myself and if you’re unsure about adding herbs to a biscuit you’ll just have to give it a try!

Ingredients

You will need (for 12 squares):

  • 180g plain flour
  • 1 tbsp cocoa powder
  • 50g caster sugar
  • 150g softened butter
  • 50g dark chocolate, finely chopped
  • 1tsp dried thyme
  • Zest 1 lemon

Method

Preheat your oven to 160C and line a baking dish; I used a square one for this batch but round or circular dishes work just as well.

Put all of the ingredients into a large bowl, or mixer, and beat together until they form a dough. Remove from the bowl and knead lightly.

Press the dough into the tin, spreading it out evenly, then prick the top of the shortbread with a fork. Bake for 45 minutes.

Remove from the oven, mark into squares then leave to cool before removing the biscuits from the dish.

You can’t go wrong with a dark chocolate shortbread biscuit, and that’s certainly the case when they’re served warm from the oven. The added thyme gives a little warmth and herbal note which coupled with the fresh, zesty lemon is just the thing with a cup of tea. Dried thyme works well in this as I think the oils in fresh thyme might taint a little as it gets baked in the oven. I have previously tried a similar combination of flavours with my chocolate, rosemary and hazelnut biscuits. I would like to try infusing some bay with a white chocolate mousse or sauce at some point in the future too.

Filed Under: April, Baking, Biscuit, Butter, Chocolate, Herbs, Lemon, Recipes By Month, Seasons, Shortbread, Spring, Thyme Tagged With: Baking, biscuit, Chocolate

Blood Orange Posset

February 7, 2018 By All That I'm Eating 14 Comments

blood orange possets in individual glasses

Slicing open a blood orange has an air of anticipation about it. Will it be intense purple almost throughout, have a few red stripes or actually be mostly orange? Whichever colour you end up with they all have the same fantastic flavour. I love cooking with blood oranges; adding a splash to a cocktail or baking them into something delicious. This recipe for blood orange posset was something I had never tried before and I couldn’t believe how easy it was to make. Just three ingredients are needed for a pudding that tastes so much more than the sum of its parts.

Ingredients

You will need (for four individual possets):

  • 400ml double cream
  • 150g golden caster sugar
  • Zest and juice two blood oranges

Method

Add the cream and sugar to a large pan and bring the cream up to the boil. Stir it all the time to ensure the sugar dissolves and the cream doesn’t catch.

Boil the cream and sugar together for three minutes stirring continuously.

Remove the cream from the heat and add the blood orange zest and juice.

Pour the posset mix into four glasses or cups and then leave to set in the fridge for at least four hours.

When you are ready to serve grate over a little dark chocolate.

These are fantastic served with chocolate shortbread so you can dip the shortbread into the posset and scoop it all up!

Can you ever go wrong with chocolate and orange together? I don’t think so and this classic flavour combination is so honest in this dessert. Such simple flavours; no fuss or flair, just pure zingy orange mixed into thick cream and dark chocolate. It’s almost unbelievable how well it sets considering there are just three ingredients but it’s thick, rich and spoonable and perfect served with crunchy shortbread. For a pudding that takes just minutes to make this blood orange posset will be my go to dessert for any dinner party!

Filed Under: Chocolate, Cream, Dairy & Eggs, February, Fruit, Orange, Pudding, Recipes By Month, Seasons, Winter Tagged With: blood orange, pudding, recipe

Mini Toffee Pear Pies

October 17, 2017 By All That I'm Eating 15 Comments

pears for making pies

I think pears are annoying. Lovely, but annoying. They sit around in the fruit bowl looking all delicious and they’re never ripe. Then, when one is ready to eat the rest immediately go ripe too and then you have to eat them all at once. Well I’m not standing for it any longer, I decided that I would use the pears while they are under ripe so I can enjoy them while waiting for the others to ripen. The word ripe has lost all meaning. These mini toffee pear pies are made from surprisingly few ingredients (if you buy readymade pastry) and are just perfect for celebrating the pear in all its I’m-never-quite-ready-ok-now-I’m-too-ready glory.

Ingredients

You will need (for 12 mini pies):

  • 6-7 medium pears, just under ripe is ideal (alternatively you could use some sharp apples)
  • 75g salted butter
  • 2 tbsp dark muscovado sugar
  • Zest 1 lemon
  • 1 sheet readymade and rolled shortcrust pastry
  • Milk for brushing
  • Caster sugar

Method

Start by making the pie filling. Chop the pears up into small chunks and get a frying pan on a low/medium heat.

Add the butter and the sugar to the frying pan and leave to soften and mix together. Once you have a lovely, dark brown, smooth sauce tip the pears in and continue to cook for a few minutes so that the pears get well covered and the sauce thickens. Add the lemon zest. Put to one side to cool.

Roll the pastry out on a floured surface to make it around half as big again. You will need two fluted pastry cutters: one 8.5cm and one 6cm.

Lightly grease a 12 hole cupcake tin.

Cut out 12 circles of pastry with the larger cutter and put these into the holes in the cupcake tin. Re-roll the pastry and cut out 12 circles with the 6cm cutter.

Preheat an oven to 180C.

Spoon the cooled pear mixture into each pastry case, top up each mini pie with any leftover caramel sauce.

Brush the edge of the pastry cases lightly with milk and then put the smaller pastry circles on top. Seal with your fingers or a fork. Brush the tops of the pies with a little more milk, add a small steam hole in the top of each pie with a sharp knife, then sprinkle with a little caster sugar.

Bake in the oven for 20-25 minutes or until the tops are golden brown.

I served a few of them warm, straight from the oven with a drizzle of double cream. What a little piece of loveliness that was. The fruit inside is soft and slightly sharp, the toffee sauce has bubbled up onto the pastry and made a sticky, sweet edge and the pastry is warm and crisp. Adding the lemon prevents the pie from being overly sweet. These would be perfect to take on a picnic or to nibble on for bonfire night. Alternatively, and this is quite a niche suggestion, if you have a log burner, pop a couple of pies on a piece of foil on top of the burner and wait for them to get warmed through before serving with ice cream.

Filed Under: Autumn, Baking, Butter, Caramel, Dairy & Eggs, Fruit, Lemon, October, Pastry, Pear, Pie, Recipes By Month, Seasons Tagged With: Baking, pear, recipe

Peanut Butter and Raspberry Brownies

September 6, 2017 By All That I'm Eating 12 Comments

peanut butter brownies out of the oven

I’m not sure these Peanut Butter and Raspberry Brownies need an introduction; just the name gets my mouth watering and a hankering for a piece with a coffee shortly follows. I’ll be honest from the outset, these are not exactly what you’d call healthy. They are full fat, properly indulgent, to-hell-with-it brownies. And frankly, when you’ve been working hard all day coming home to one of these and a cuppa is like a hug for the soul. A gooey, chocolatey, nutty…stop it…slice of comfort.

Ingredients

You will need:

  • 100g salted butter
  • 170g golden caster sugar
  • 50g light muscovado sugar
  • 100g dark chocolate, broken into pieces
  • 1 1/2 tbsp golden syrup
  • 2 eggs
  • 100g self raising flour
  • 2 tbsp cocoa powder
  • 150g crunchy peanut butter
  • 100g fresh raspberries

Method

Grease and line a 9 inch square cake tin. Preheat an oven to 180C.

Add the butter, sugars, chocolate and golden syrup to a saucepan and melt over a low heat. Stir occasionally until everything is melted and well combined. Remove from the heat and leave to cool a little.

Beat the eggs in a bowl then add the melted chocolate mixture.

Sift the flour and cocoa powder into the bowl and then fold through the mixture. Stir through half the raspberries.

Tip the brownie mix into the tin. Dollop the peanut butter over the top then swirl this through the brownie with a skewer. Top with the remaining raspberries.

Bake for 30 minutes.

Remove from the oven and leave to cool slightly before removing and cooling on a wire rack. Mark into portions when cold.

The raspberries on the top have a completely different texture to the brownies inside the mix; a lovely acidic, fresh contrast to everything that’s going on around it. Chocolate brownie wise you’re looking at a cakey on the outside, gooey in the middle kind of situation; full of the richness from the dark chocolate and cocoa and just sweet enough. Using crunchy peanut butter means they have a wonderful additional crunch and texture. As autumn creeps up on us these will give you as much warmth as any blanket. If you’re loving the look of these brownies, perhaps you might be interested to try my Chocolate Fudge Cheesecake Brownies (yes, you read that correctly) or my White Chocolate and Blackcurrant Blondies.

If you find yourself in the awkward situation that I did where there was one peanut butter and raspberry brownie left and two people wanting to eat it I have an excellent plan for such an occurrence. Take two bowls and scoop some vanilla ice cream into each one, warm the brownie up slightly, then divide warm brownie between bowls. Thank me later.

Filed Under: Autumn, Baking, Berries, Butter, Cake, Chocolate, Dairy & Eggs, Eggs, Fruit, Raspberry, September Tagged With: Baking, brownie, Chocolate, recipe

  • 1
  • 2
  • 3
  • …
  • 10
  • Next Page »

Hello I’m Caroline

Welcome to my site All That I’m Eating. You will find inventive recipes using seasonal and foraged ingredients as well as everyday easy meals and a few indulgent recipes too.

I believe humble food doesn’t have to be hum drum so whether you’ve oodles of onions, superfluous sausages or apples aplenty I hope you enjoy having a look around.

Find Out More…

Never Miss A Thing

Subscribe here!

Get all my posts straight to your inbox.

Instagram

Instagram did not return a 200.

Quick Links

  • About Me
  • Contact Me
  • Caroline Taylor Communications

Recent Tweets

  • Error: Invalid or expired token.

© 2018 Caroline Taylor - All That I'm Eating
·
Privacy and Copyright
·
web design::mogul

This website uses cookies to improve your experience. We'll assume you're ok with this, but you can opt-out if you wish.Accept Read More
Privacy & Cookies Policy

Privacy Overview

This website uses cookies to improve your experience while you navigate through the website. Out of these, the cookies that are categorized as necessary are stored on your browser as they are essential for the working of basic functionalities of the website. We also use third-party cookies that help us analyze and understand how you use this website. These cookies will be stored in your browser only with your consent. You also have the option to opt-out of these cookies. But opting out of some of these cookies may affect your browsing experience.
Necessary
Always Enabled
Necessary cookies are absolutely essential for the website to function properly. This category only includes cookies that ensures basic functionalities and security features of the website. These cookies do not store any personal information.
Non-necessary
Any cookies that may not be particularly necessary for the website to function and is used specifically to collect user personal data via analytics, ads, other embedded contents are termed as non-necessary cookies. It is mandatory to procure user consent prior to running these cookies on your website.
SAVE & ACCEPT