You know the feeling. When you get home from work, you’re tired and don’t want to stand around in the kitchen getting dinner ready. This feeling is magnified if it happens to be raining and/or you have a cold at the same time. Part of you wants to pick up the phone and get a takeaway but part of you knows that you really should cook something, especially if you already have all the ingredients. I have found a secret way to get round this and it relies on two things: firstly, that you can call upon your favourite quick recipes and secondly, the moment you start to chop the ingredients you’re committed. Once you’ve picked up that knife and sliced through that onion you’ve started dinner and suddenly, even on the worst days, it’s not such a mountain to climb.
Carrot Falafel and Quick Pickled Onions
I’ve tried to make falafel a few times before without much success; it seems to fall apart when I cook it. Experimenting with this falafel recipe, a bit more of this and a bit less of that, means that I’ve now ended up with a pretty sturdy recipe. These carrot falafel are really easy to make; everything gets blended together, and I’ve served them with all my favourite sides. Quick pickled onions will be appearing on everything from now on!
Ingredients
You will need (for two):
- 1 tin chickpeas, drained and rinsed
- 100g carrots, grated
- 1 clove garlic, crushed
- 1/2 tsp ground cumin
- 1/2 tsp sweet paprika
- Zest 1 lemon
- 1/4 tsp chilli powder
- Salt and pepper
- 1 tbsp plain flour
- Sesame seeds
- Oil for frying
For the Pickled Onions
Moussaka – without frying the aubergines
Moussaka is one of my favourite dishes to eat. It’s a bit of an involved one to make, you need four different cooking pans going to make all the component parts; that’s why I don’t make it very often! Frying the aubergines, I think, is one of the most laborious parts of making the moussaka so I’ve got a different way of doing it. My moussaka without frying the aubergines is every bit as good as the original and you use far less oil than if you fry them. Win win.
Leaving the bay leaf in the sauce while it bakes really helps to impart a lovely flavour into the béchamel sauce. I’m not sure the potatoes on top are necessarily that traditional but I know so many people who add them to the top that I can’t imagine eating moussaka without them. This is a rich, full of flavour meal and cooking the moussaka without frying the aubergines does make things easier. The once or twice a year I make moussaka I try to make a double batch so that I can keep one in the freezer for a rainy day.
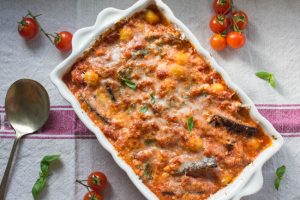
Aubergine and Ricotta Gnocchi Bake
What’s that? More aubergines? Yes actually, and I make no apologies because this Aubergine and Ricotta Gnocchi Bake is so good that I think we can all forgive if I’ve been a little heavy on the aubergine recipes of late. The key to this dish comes down to two things. Firstly, the aubergine has to be fried beautifully to make sure it’s soft, silky and golden brown. Secondly, adding a handful of cherry tomatoes really transforms the tomato base as it adds a wonderful freshness and sweetness. This is such a delicious vegetarian dish and one that feels at home as much now, in the summer, as it would in the autumn.
Ingredients
You will need (for two):
- 2 medium aubergines, cut into length slices, then halved and chopped into finger sized pieces
- 1 small onion, finely chopped
- Olive oil for cooking
- 2 cloves garlic, crushed
- 1 tin chopped tomatoes
- Handful really ripe cherry tomatoes, halved
- 200g ricotta cheese
- Pinch sugar
- Few sprigs fresh basil and oregano, roughly chopped
- Salt and pepper
- Parmesan cheese
Method
Get a large frying pan on a medium heat and add a little oil, you need enough to just cover the bottom of the pan. Add the aubergine and fry until golden brown and soft. You may need to do this in batches depending on how much aubergine you have and how big your pan is. Once the aubergine is done place it on some kitchen paper to remove any excess oil.
Add a little more oil to the pan and add the onion. Fry for around 10 minutes before adding the garlic. Continue to fry for a few more minutes then tip in the chopped and cherry tomatoes.
Bring the tomato mixture to a simmer and continue to simmer until it’s reduced by around a third then add the sugar, salt and pepper, basil and oregano.
Bring a pan of salted water to the boil and cook the gnocchi according to pack instructions; but drain them around 30 seconds before the pack says to. The gnocchi will continue to cook in the oven.
Remove the tomato sauce from the heat and stir in the ricotta and aubergine.
Drain the gnocchi and add to the tomato and aubergine mix, stir everything together well and then put into an oven proof dish. Grate over a little Parmesan.
Bake in a preheated oven at 200C for around 20 minutes or until the top is golden and bubbling.
You could definitely try using any shape of pasta rather than gnocchi if you wanted to. I know you shouldn’t really cook with basil but I actually like the way the leaves wilt and give their subtle flavour over to the sauce once they are cooked. It’s great to dive into this dish and get a forkful of everything: sticky gnocchi, soft aubergine, creamy ricotta, a chunk of tomato, a bit of basil and a bit of punch from the Parmesan. I don’t think a few slices of fried courgette would go amiss either.
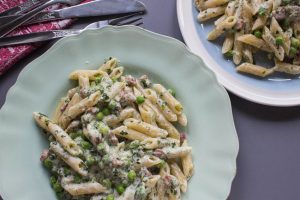
Creamy Bacon, Spinach and Pea Pasta
This is a recipe I have actually made and eaten in a few different guises. Once I added the same ingredients but made it into a macaroni cheese, another time I added similar ingredients and had a cold pasta salad. My creamy bacon, spinach and pea pasta is a real favourite in our house for two reasons: we almost always have all the ingredients, and it’s cheap and quick to make. I don’t know what it is about peas and pasta but I love the combination of silky, smooth pasta and squeaky peas. With so many things going on at the moment, the World Cup, Wimbledon about to start, this excellent weather and doing up the house anything that takes less than half an hour to make is my best friend.
Ingredients
You will need (for two people):
- Olive oil for cooking
- 1/2 mug frozen peas
- 2 nuggets frozen chopped spinach
- 100g (ish) smoked bacon lardons or pancetta
- 300g crème fraîche
- 150g pasta
- Salt and pepper
- Parmesan to serve
Method
Add a little olive oil into a frying pan and add the bacon. Fry over a low heat until the fat starts to melt out of the bacon.
While the bacon is frying bring a large pan of salted water up to the boil. Add the pasta and cook according to pack instructions.
Turn the heat up on the bacon so it turns brown and crispy then add the peas and spinach. Leave to cook for 2-3 minutes and break the spinach down with a wooden spoon. Stir the crème fraîche into the pea mixture then bring to a gentle simmer.
Drain the pasta reserving a small amount of cooking water.
Add a little salt and plenty of pepper to the peas and bacon before mixing with the pasta and cooking water to make a smooth sauce.
Top with grated Parmesan before serving.
If you haven’t tried frozen spinach it is such a great ingredient. I chuck it in everything from sauces to soups and pestos. Fresh spinach would be delicious to use and if any arrives in the veg box I would definitely use that instead; just wilt it first, squeeze out the moisture and roughly chop before adding in. Salty, smoky bacon with sweet peas, earthy spinach, pasta and a sharp creamy sauce is such a great combination. I think I’ll try stirring this mixture, without the crème fraîche, through a risotto soon too.
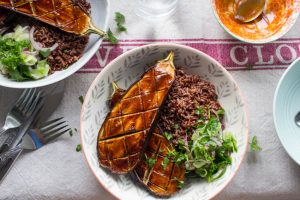
Miso Glazed Aubergine with Pickled Cucumber Salad
I’m not ashamed. I will admit it. I am an aubergine-aholic. Babaganoush, parmigiana, in a curry, moussaka, stirred through pasta there isn’t any meal I don’t love which has aubergines in. This recipe may sound familiar, as I have made something similar before, but this miso glazed aubergine when combined with a quick pickled cucumber salad really is a match made in heaven. Depending on the size of your aubergines this takes around half an hour to make, a little longer if they are large and need more time in the oven.
Ingredients
You will need (for two):
For the aubergines
- 2 aubergines, sliced in half lengthways and flesh scored in a criss cross pattern (don’t slice into the skin though)
- 2 tbsp miso paste (the best you can get your hands on)
- 1 1/2 tbsp soy sauce
- 2 tsp runny honey (use agave or maple syrup to make it vegan)
- 1 tsp water
- 1 tbsp rapeseed oil
For the cucumber pickle
Chipotle Sweetcorn Hash
I love looking in my fridge and cupboards and finding ingredients and flavours to try together. Recently I wanted to try adding chipotle chillies to more than just chilli con carne and I thought it would be worth trying a pinch with sweetcorn. This chipotle sweetcorn hash came out of a mish mash of ingredients I happened to have to hand and the end result was delicious. Sticky, sweet, spicy and moreish I’ll be making this one again soon!
Ingredients
You will need (for two):
- Knob of butter
- Rapeseed oil (for cooking)
- 1 small onion, finely sliced
- 2 garlic cloves, crushed
- 1 tsp dried oregano
- ½ tsp chipotle chilli flakes
- 1 tsp ground cumin
- 1 mug frozen sweetcorn
- 300g potatoes, scrubbed and diced into 1cm cubes
- Juice ½ lemon
- 2 chicken breasts
- 2 tsp paprika
- Salt and pepper
- Plain yoghurt
- Small handful fresh coriander, roughly chopped
Method
Heat the butter and a glug of oil together in a frying pan and add the onions. Fry for around 10 minutes on a medium heat before adding the garlic and all the spices and oregano. Continue to fry for a few more minutes.
Add the potato and continue to fry for around 15 minutes with a lid on, stirring from time to time. After 15 minutes add the sweetcorn and continue to cook with the lid off for another five minutes.
While the potato cooks put the chicken breasts between two sheets of clingfilm and bash with a rolling pin to flatten. Sprinkle the paprika and a little salt and pepper onto each side.
Get another frying pan onto a medium heat and add a little oil. Fry the chicken on both sides until cooked through and golden.
Add a little seasoning and the lemon juice to the potato pan. Stir the coriander through the yoghurt.
Serve up the sweetcorn hash topped with the chicken and coriander yoghurt.
This would be delicious with tofu rather than chicken if you wanted to make it veggie.
The smokiness of the chipotle is so good with the sweetness of the sweetcorn, it would be great with a few peas too I think. I love how the golden strands of onion become entwined with the cubes of potato. The chicken is succulent and the yoghurt takes the heat off the chilli. All in all, for a few ingredients I already had and threw together, this was a delicious dinner!
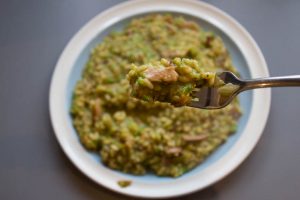
Pea, Bacon and Sundried Tomato Risotto
I love how a recipe evolves over time. Many risottos have been made in my kitchen over the years and I have to say a pea risotto has got to be one of my favourites. This recipe for pea, bacon and sundried tomato risotto is, in my opinion, the very best it can be. Other variations have included chorizo, fried speck, mint, goat’s cheese or spinach but this combination of ingredients gives such a variety and depth of flavour that is hard to beat.
ingredients
You will need (for two people):
- 1 small onion, finely diced (preferably not a red onion)
- 2 tbsp olive oil
- 1 small garlic clove, crushed
- 4 sundried tomatoes, finely chopped or sliced
- 175g risotto rice
- 500-600ml hot vegetable or chicken stock
- 1 mug full frozen peas
- Small knob of butter
- 4 rashers smoked bacon, chopped
- Salt and pepper
- 25g Parmesan cheese, grated
method
Start by adding the oil and onion to a saucepan and frying gently for at least 15 minutes until the onion is softened and not coloured. Add the garlic and sundried tomatoes and continue frying for a few more minutes.
Stir the rice into the onion mixture and cook for another minute or two before adding a little vegetable stock.
Add a little vegetable stock to the rice mixture at a time stirring well between each addition and ensuring the stock has been full absorbed before adding the next.
While the risotto is cooking you’ll need to get a small pan of water boiling for the peas and a frying pan heating up for the bacon.
Test the rice to see if it’s cooked and if so, remove the pan from the heat, pop the lid on and leave to one side for five minutes.
While the risotto is resting cook the peas in the boiling water and fry the bacon until crispy.
Blend the peas with a little butter to make a rough puree. If you’d rather add the peas whole that’s no problem, I just love the bright green colour blending them gives the risotto.
Stir the peas, bacon and Parmesan into the risotto, check the seasoning and add a little salt and pepper if it needs it.
At the heart of any good risotto is of course the perfectly cooked rice, cheese and onion combo. Adding the sundried tomatoes gives such a punchy, savoury flavour which coupled with the sweet peas and salty bacon is just the best. Slightly different to my normal weeknight recipes where I try to use as few pans as possible this recipe is definitely worth the extra washing up.
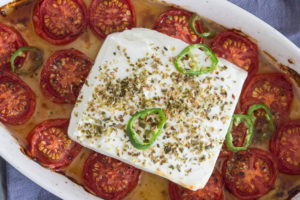
Tomato Baked Feta
Feta’s not just for salads you know. I enjoyed something similar to this tomato baked feta while in Greece a few years ago; I needed to try and make it at home. I have previously posted about some Greek inspired feta and tomato spaghetti (which is delicious by the way) and the key to both of those dishes is using the best tomatoes and feta you can get your hands on. In this case it’s also about baking the tomatoes perfectly; not too hot so that they dry out and not too cool so that they turn into mush.
Ingredients
You will need (for the cheesiest sharing dinner for two):
- 250g ripe tomatoes, halved
- 2 tbsp extra virgin olive oil
- Salt and pepper
- 1 block feta cheese
- 1/2 green chilli, sliced
- 1 tsp dried oregano (if you have fresh, all the better)
Method
Preheat an oven to 200C.
Put the tomatoes into a baking dish in a single layer so that they fit snugly but there are a few gaps. Drizzle over the olive oil and add a little salt and pepper.
Bake for 20 minutes.
Remove the tomatoes from the oven and add the sliced chillies and feta (try and keep the feta in one block if you can). Sprinkle over the oregano and return to the oven for another 15 minutes.
Serve on the table with some crusty bread and get dunking or serve with a herby pasta salad.
If you’ve not tried baking feta before I urge you to give it a go; the edges catch and turn golden brown but the middle turns gooey and soft. If you don’t fancy adding the chilli you can leave it out, it adds a lovely fresh chilli flavour but you could use a few thin strips of pepper. There are loads of variations of this you could try; roast on top of mixed veg, add a few olives or peppers or if you can get hold of some use kefalotyri instead of feta.
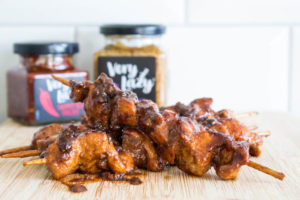
Spicy Sticky Chicken Skewers with Very Lazy
As you might already know I am a big fan of simple, straightforward cooking. I suffer from hangryness you see and when I get home on a busy weekday evening I want something full of flavour that can be rustled up in no time at all. So welcome my Sticky Chicken Skewers into your kitchen. They take just minutes to prepare and the whole meal (including potatoes and tomato salad) is on the table in well under 30 minutes. Just because it’s quick cooking doesn’t mean anything should be skimped on, it should still be full of quality ingredients and downright delicious. Word of warning though, you might walk round work all day with a very smug look on your face knowing you’ve got a great dinner to go home to when you get these on to marinate, do try and hide it.
Ingredients
You will need (for two):
- 2 chicken breasts, diced (you could use scored drumsticks, thighs or wings but they’ll take longer to cook)
- Juice 1 lime
- 3 tbsp maple syrup
- 25ml bourbon (don’t worry if you don’t have any, just leave it out)
- 1 tbsp soy sauce
- 1 ½ tsp Very Lazy Red Chillies
- 2 tsp Very Lazy Smoked Chopped Garlic
- 1 tbsp rapeseed oil
- Salt and pepper
Method
Mix together all the ingredients apart from the chicken to make the marinade. The joy of this marinade is that there is no chopping involved, just a spoon of this and a splash of that and it takes no time at all to prepare.
Add the chicken to the marinade and stir it all together to ensure the chicken is fully coated. Cover and put in the fridge for at least two hours, ideally overnight. I prepared mine the morning before I went to work.
Put the diced chicken onto skewers reserving any leftover marinade. Top tip – soak the skewers in water for a few hours before using them to prevent them burning when cooked.
Heat a pan on medium-high and add a little oil. Pop the chicken skewers in and fry, rotating the skewers until the chicken is cooked basting with the leftover marinade. Keep cooking until the marinade has all been added and has reduced down leaving everything lovely and sticky.
Serve with simple boiled new potatoes and a dressed tomato salad; both of which you can get ready before you fry the chicken.
I have to admit that I loved this sticky marinade so much that I have also tried it with aubergine slices (I mixed up the marinade and brushed it on when the aubergine was almost cooked) and tofu (ideally an overnight marination) both fried and barbecued and both were excellent. The marinade itself is actually vegan so you could use it on anything you liked.
It’s the sticky texture of the marinade that really makes it, the flavours get so intensified with all the marinating and reducing. I took time to make this taste just how I wanted it to and I think it has a bit of everything; the soy and maple combination bring savoury and sweet, the lime brings freshness and the bourbon a faint oakiness. The amount of Very Lazy Red Chillies I used gives the finished skewers a mild to medium heat so you can add more or less depending on how hot you like it; the smoked garlic gives a wonderful subtle smokiness to the whole marinade. Now, when can I put them onto the meal plan again?
This is a sponsored post and I was reimbursed by Very Lazy for my time and ingredients. All opinions and words are (as always) my own. Thank you for supporting the brands that support me.
- « Previous Page
- 1
- 2
- 3
- 4
- …
- 11
- Next Page »

